I've been an avid Frontend engineer trying to improve the apps I work on. I've written apps from the scratch and have also worked on improving apps that others have written over the period of time. Here I am with tips and tricks that I consider are valuable for someone like me trying to improve the performance of the App. There are multiple ways in which the performance of a web app can be improved. We will look into smaller changes that make larger impacts.
There are two aspects while working on performance
- How can we improve the existing code?
- How can we optimize the code that is to be added?
How can we improve the existing code?
1. Occlusion rendering:
There are some aspects that we tend to forget while developing web applications. One of them is handling a huge amount of data. For example consider having a dropdown of 10 options which is fine, But what if the dropdown could have 1000 elements ? What if it could have 10000 elements inside of it ?

For every 3000 options to render inside of the option it is going to take a huge amount of time.
To solve this try occlusion rendering the dropdown options. With this approach we will render the options on demand and maintain only limited options in the DOM.
How can we do this ?
This is pretty easy you either can use existing libraries like vertical-collection if you are using EmberJS or you can go ahead with react-virtualized or react-window if you are using React.
What is happening in the DOM ?
The options that move out of view are removed from the DOM and options that come in are appended with the help of intersection observers. So only a portion of the options are rendered initially resulting in faster initial renders and avoids bloating the DOM
Improvements with this change
| Number of elements | Time taken without occlusion (avg) | Time taken with occlusion (avg) | Time reduced (ms) |
|---|---|---|---|
| 100 | ~168.95 ms | ~12.90 ms | ~156.05 |
| 500 | ~712.55 ms | ~12.60 ms | ~699.95 |
| 1000 | ~2628.5 ms | ~18.20 ms | ~2610.3 |
| 2000 | ~ 6196.5 ms | ~18.10 ms | ~6178.4 |
| 5000 | ~7336 ms | ~18.50 ms | ~7317.5 |
| 10000+ | ~8412ms | ~19.80 ms | ~8393 |
Note: The time was obtained using the render performance tab of the ember inspector. Time is subjected to vary depending on device.
We actually saw so much reduction in the loading time of the dropdown component without even enabling CPU throttling.
Now we can render large amounts of data without any hassle.
2. Moving away from regular image formats.
Yes you heard it right. Moving away from JPEG, PNG , JPG formats to webp.

But what is WebP? WebP is a modern image format that provides superior lossless and lossy compression for images on the web (more info here :https://developers.google.com/speed/webp ). WebP lossless images are 26% smaller in size compared to PNGs. WebP lossy images are 25-34% smaller than comparable JPEG images at equivalent SSIM quality index.
How can we do this ?
For static images: You have to first convert the images that you have to WebP images. You can use any build tools to convert your images to WebP with plugins like grunt-cwebp or imagemin-webp. Write a component that can render WebP images to the compatible browsers or serve JPEG if the browser doesn't support WebP. Check if the browser is compatible with WebP here https://caniuse.com/webp.
Dynamic images: Have a custom lambda function that will convert the images to WebP and store it in an appropriate manner.
How to handle browser compatibility ?
You can make use of picture tags to handle browser compatibility. The picture tag will take source as default way to render image. So we give the WebP image URL to the source.

How much improvements did we see with this change ?
Static image file size reduced by 25-30% after converting them to webp. This creates a large impact for the users with slow networks. This site makes use of static webp images
Now we come to the second part
How can we optimize the code that is being added?
Moving API calls from routes to the component that requires data from the API.

Although this may seem a small change this actually saves time for the initial route load or sometimes the api call itself. Instead of fetching all data at once during the route or page load we need to fetch the data from the component only when needed. This will decrease the load time and avoid unnecessary computation of data.
Until the data is fetched how do we handle the state of the component ?
We add fallback loading state for components that fetch data from API.
How do we do this ?
Look out for the API calls that are required for the route. Try figuring out if we really need that API call by blocking that call. If it is not needed for the initial load, move it to the component. Add a loading state for the component and mount the actual component when the promise is settled.
How much improvements do we see with this change ?
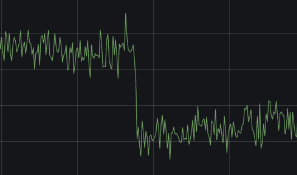
We were able to sort out the calls that are needed for the initial load and we saw about a 12-15% improvement in the initial loading time and we also saw a huge drop in the requests for that API endpoint.

ps: the image you see above is a sample of what will happen when you lazy load an API call.
The abnormality you see is before and after the changes went live after lazy loading an component with API call. The requests reduced half.
to be continued....